
A peeling patch doesn’t automatically mean stripping the whole wall. Fixing peeling paint before an open house starts with removing loose paint and assessing what remains; if paint keeps lifting or comes off in sheets, more of the wall may need stripping. In Australia, homes built before 1979 should be checked for possible lead-based paint before you disturb old paint.
It’s tempting to cover a damaged spot with fresh paint when an open house is approaching. But paint may peel again if moisture or poor preparation is left unaddressed, so a lasting repair takes more than a quick touch-up.
This guide explains how to check for moisture, remove loose paint safely, patch and sand damaged areas, and prepare the surface for repainting. You’ll also learn when to stop before disturbing paint that may contain lead, and how to tell whether the damage is localised or needs wider attention.
Key Takeaways
- Don’t assume the whole wall needs stripping: remove loose paint and assess whether the remaining paint is firmly bonded.
- Look for damp patches, bubbling, stains, mould or musty smells, and address the moisture source before repainting.
- For a sound repair, clean the surface, patch damage, let the compound dry, then sand and prime bare plaster and repairs.
- Choose primer and paint to suit the surface and room, and allow each coat to dry before applying the next.
- Before disturbing old paint, remember that Australian homes built before 1979 should be checked for possible lead-based paint.
Why Is Paint Peeling Off My Walls?
Peeling usually means the paint has lost its bond with the surface. Poor preparation, moisture, dirt, unsuitable paint or the wrong primer can all contribute.
- Find the cause before preparing the patch. A useful first step in fixing peeling paint before an open house is checking the wall’s condition. Look for dampness, dust, plaster powder, grime or signs of an earlier repair. Paint can also fail if a previous coat hadn’t dried, or if someone used interior paint outdoors. Don’t cover dampness or mould with fresh paint.
- Choose primer for the surface. Read the product label and select a primer suited to the wall and its condition. Bare plaster and patch repairs need priming or sealing before topcoat. Unsealed plaster can lead to uneven sheen, patchy colour or paint lifting in sheets. Match the primer to the surface instead of relying on the topcoat alone.
- Select paint for the room or location. Use paint suited to the surface and its exposure. For example, choose exterior paint for an outdoor wall, not interior paint. Standard paint used in a wet area can also contribute to paint problems. Follow the product instructions for preparation and application, and allow each coat to dry before applying another.
- Work out DIY materials without relying on a generic price. The cost depends on the size of the repair, the wall’s condition and the supplies already on hand. Allow for primer, matching paint, patching compound and preparation materials. A small, sound patch needs less material than widespread flaking or damaged plaster.
- Plan for drying before the open house. Drying time varies by product and conditions, so follow the tin’s instructions for recoating and handling. Surface drying isn’t the same as curing, when paint hardens fully. Avoid touching, cleaning or placing furniture against the repair too soon. Damp conditions and insufficient time between coats can contribute to paint failure.
- Allow enough time for each repair stage. A local repair may fit into one day when the paint is firmly bonded beyond the patch, damage is minor and each layer dries in time. Extensive patching, damp walls or slow drying can extend the work. Leave time to prepare, prime, paint and inspect the finish before visitors arrive.
- Blend the finish with the surrounding wall. For fixing peeling paint before an open house, match the existing colour and sheen, then apply the paint evenly. Keep a wet edge to reduce visible overlaps. Let the repair dry before judging the result, since a fresh patch can look different while wet. If it remains conspicuous, painting the full wall can create a more consistent finish.
Identifying moisture as a cause of peeling
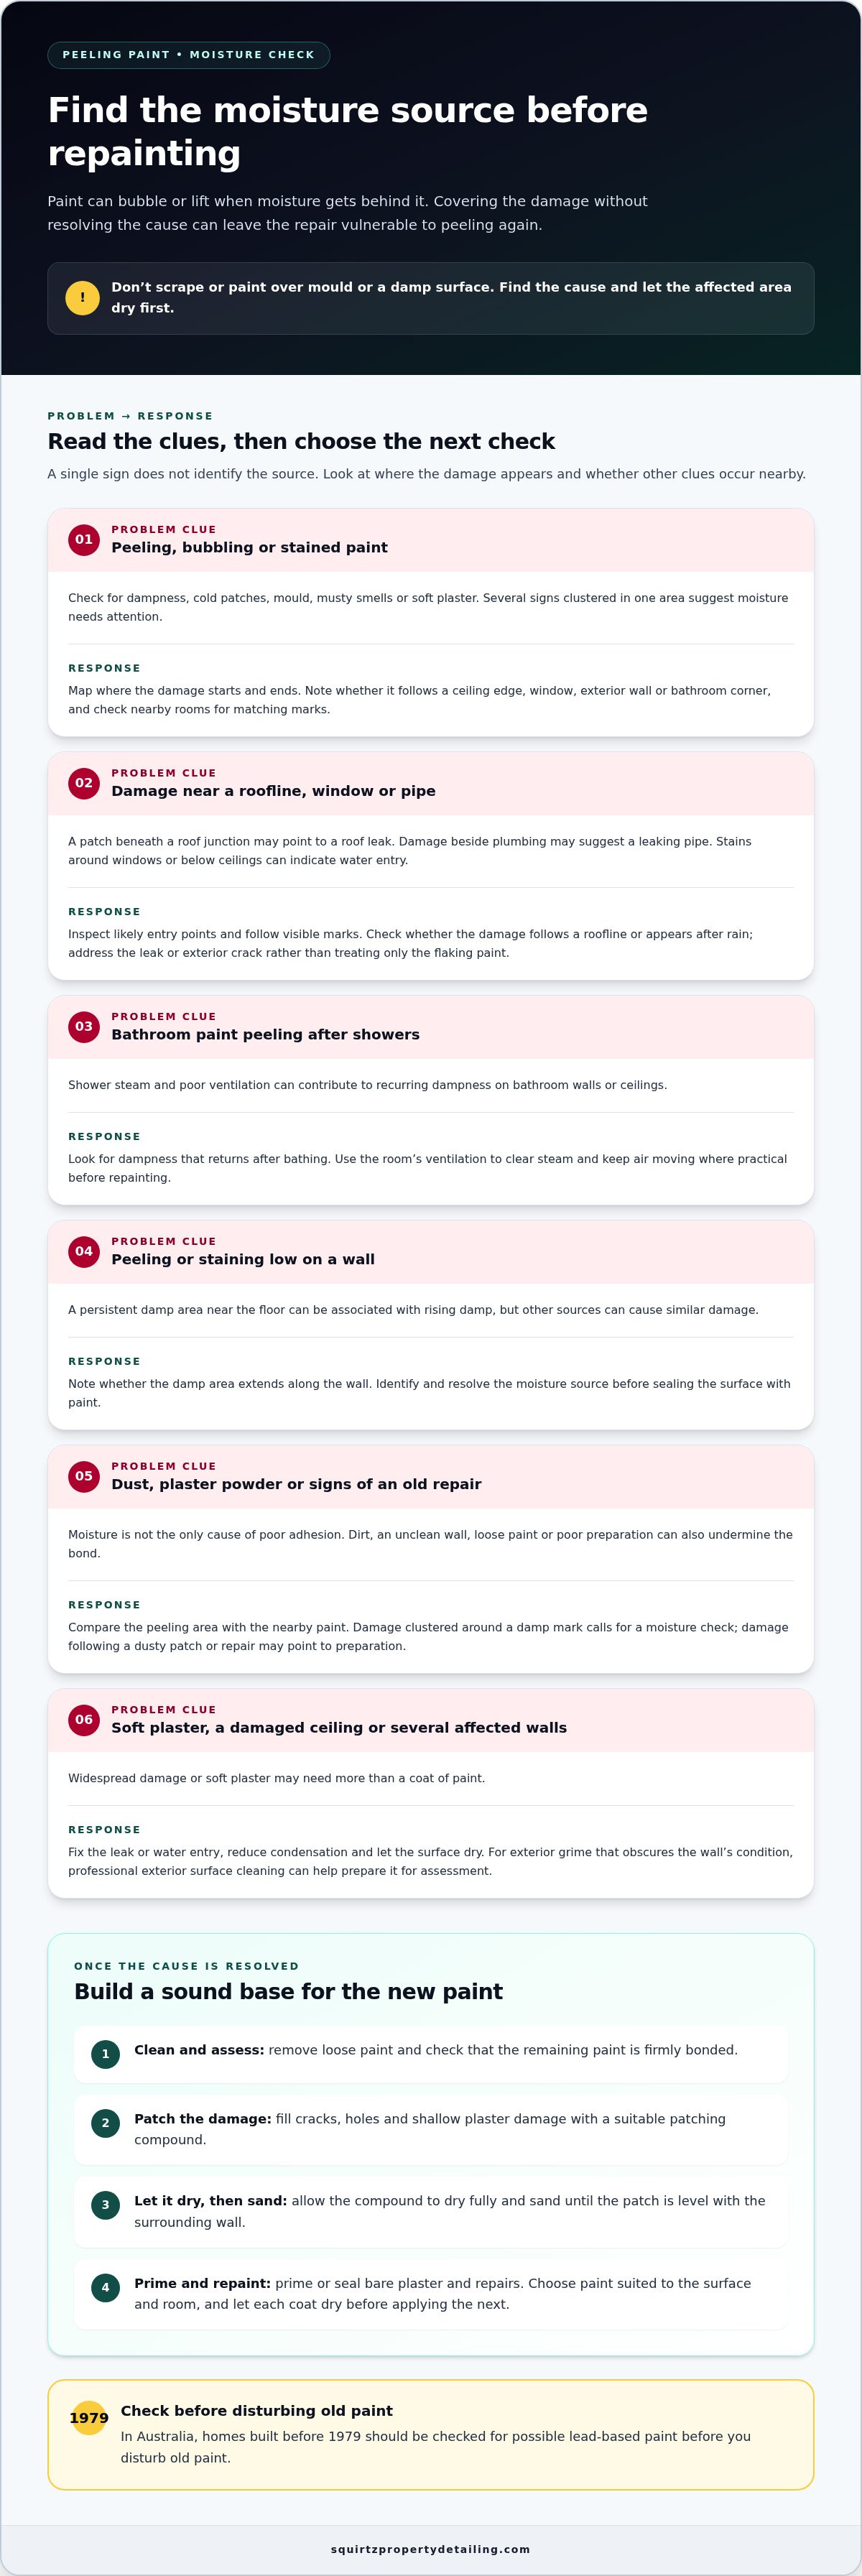
Paint may bubble or lift when moisture gets behind the coating. Find and address the source before repainting, or the repair may fail again.
- Map the damaged area. Note where peeling appears and whether it follows a ceiling edge, window, exterior wall or bathroom corner. Check nearby rooms for matching marks. A patch beneath a roof junction may point to a roof leak; damage beside plumbing may suggest a leaking pipe. These clues help narrow the search.
- Look for more than peeling. Check the wall for dampness, cold patches, bubbling, stains, mould, musty smells or soft plaster. A single sign doesn’t identify the source, but several signs in one area suggest moisture needs attention. Don’t scrape or paint over mould or a damp surface.
- Inspect likely water entry points. Look for stains below ceilings, around window frames and near exterior cracks. Check whether the damage follows a roofline or appears after rain. Water can enter through roof leaks or exterior cracks, while leaking pipes can create localised patches inside. Follow visible marks rather than treating only the flaking paint.
- Consider condensation and ventilation. Bathroom paint may peel where shower steam collects and ventilation is poor. Look for recurring dampness on walls or ceilings after bathing. Use the room’s ventilation to clear steam, and keep air moving where practical. Improving ventilation in wet areas can help reduce moisture-related paint problems.
- Check for rising damp indicators. Peeling or staining low on a wall can be associated with rising damp, though other sources may cause similar damage. Look for a persistent damp area near the floor and note whether it extends along the wall. Avoid sealing the surface with paint before identifying and resolving the moisture source.
- Separate moisture from preparation problems. Dust, plaster powder, an unclean wall or loose paint can also undermine adhesion. Compare the peeling area with nearby paint. If the damage clusters around a damp mark, investigate moisture; if it follows a dusty patch or repair, preparation may be the issue.
- Decide what must happen before repainting. Fix the leak or water entry, reduce condensation, and let the affected surface dry. If plaster feels soft or damage covers a ceiling or several walls, the repair may need more than paint. For exterior grime that obscures the wall’s condition, professional exterior surface cleaning can help prepare the area for assessment.
Patching, sanding and cleaning surfaces
Once the moisture source is resolved, prepare the damaged area step by step. A clean, smooth, sealed surface gives primer and paint a sound base.
-
Patch and sand the surface
Fill cracks, holes and shallow plaster damage with a suitable patching compound. Keep the repair within the damaged area, then let the compound dry fully before sanding. Sand until the patch is level with the surrounding wall, without ridges or loose powder. Check the surface from different angles, as a raised edge can show through the new finish.
-
Clean and prime the surface
Remove sanding dust and grime before applying primer. Dust can weaken adhesion, while unsealed bare plaster may cause patchy colour, uneven sheen or peeling. Apply a primer or sealer suited to exposed plaster and patch repairs. Follow the product label and let the primer dry before painting.
- Check that the area is ready to work on. The wall must be dry, and the repair should feel firm, not soft or damp. Don’t paint over mould, moisture or loose material. If the patch crumbles when touched, or the plaster remains soft, repair the damaged surface before continuing. Painting over an unresolved problem can leave an uneven finish or cause more peeling.
- Remove residue without spreading it. Use a clean cloth or suitable cleaning method to lift dust and marks. Clean the prepared area, including the patch edges, so primer won’t sit on a dirty boundary. Avoid soaking plaster, as excess water can delay drying and weaken the repair. Let the wall dry before applying primer or paint.
- Inspect the prepared wall before the next coat. Look for pinholes, scratches, dust or a visible step between the patch and wall. Fill small holes, let the compound dry, then sand and clean the spot again. Bare plaster and patch repairs need primer or sealer before the topcoat. Follow the label for application and drying directions.
- Keep the repair contained where the surface allows. A firm, localised patch can be prepared without stripping the entire wall. If paint keeps lifting during preparation, stop and reassess the area. Paint coming away in sheets signals a wider adhesion problem, not a sound base for a small patch. Don’t cover that unstable boundary with fresh paint.
Follow a clear preparation sequence: repair cracks, holes and plaster damage before repainting. Let the patching compound dry fully, then sand it smooth. Keeping these steps separate prevents sanding while the compound is still drying. Before applying a new coat, make sure damaged areas are repaired rather than simply covered with paint.
After sanding, clean the surface before applying primer or paint. Treat cleaning as a separate preparation step, not something to do after coating begins. The sequence is repair, let the compound dry, sand the patch smooth, then clean before priming or painting. Repair any remaining cracks, holes or plaster damage first. This order gives each preparation step its place before the finish is applied.
Removing loose paint and sanding edges
Remove only paint that has lost its bond, then smooth the edge. Work carefully to protect sound paint and the wall beneath.
-
Remove loose and peeling paint
Wear a safety mask, gloves and goggles before scraping. Lift flaking edges with a scraper, using controlled pressure rather than gouging the plaster. In Australia, homes built before 1979 should be checked for possible lead-based paint before disturbance. Stop if paint keeps lifting or comes away in sheets; the affected area may need wider removal.
-
Sand back the paint edges
Sand the boundary between exposed wall and firmly bonded paint until it feels smooth. Keep the abrasive on the edge rather than sanding the whole wall, and avoid gouging the plaster. Remove dust before continuing. If more paint comes away as you sand, stop and reassess instead of covering an unstable edge.
- Protect the room before scraping. Move furniture away from the wall and cover nearby items and flooring. Keep children and pets out of the work area while paint flakes and sanding dust are present. Wear hearing protection when using power tools. Collect debris as you work to keep flakes contained.
- Use hand tools for controlled removal. Work from a loose edge towards paint that remains firmly attached. Hold the scraper at a shallow angle and use short strokes. Don’t force it under sound paint, as this can enlarge the damaged area unnecessarily. Check the edge as you go, and stop where the remaining coating no longer lifts.
- Judge whether the repair can stay local. A small patch may be suitable if the surrounding paint remains firmly bonded. If scraping reveals more loose layers, extend removal only to paint that comes away easily. Paint lifting across a whole wall, several walls or a ceiling needs a wider assessment. Don’t disguise widespread adhesion failure with a spot repair.
- Finish with a clean, stable edge. Brush or wipe away sanding dust, including residue along the exposed boundary. Lightly run a clean hand over the transition to feel for ridges, then inspect it in good light. The surface should be stable before patching or priming. Contain debris and dispose of paint waste responsibly.
Remove loose or flaking paint before repainting. Focus on coating that has lost its bond, without extending the work into areas that remain firmly attached. Once the loose material is gone, check that the exposed boundary is smooth and stable. A clean transition helps prevent repairs from being applied over paint that is still lifting.
When removing peeling paint, wear a safety mask, gloves and goggles. Hearing protection is also advised when using power tools. Work carefully, and pause if the coating keeps coming away beyond the expected area. Sand the edges before repainting, using only enough abrasion to smooth the boundary. Clear away dust and check the surface again. If the edge is still raised or unstable, address it before applying anything over it.
Checking for lead-based paint
In Australia, homes built before 1979 should be checked for possible lead-based paint. Paint applied to walls during the 1970s may contain lead, so avoid scraping or sanding suspect coatings until you’ve addressed that risk.
- Check the home’s age before disturbing paint. Find out whether the property was built before 1979, then consider the age of the wall’s paint layers. A later repaint doesn’t establish what lies underneath. Older layers may remain around door frames, skirting boards, ceilings or beneath newer finishes.
- Treat 1970s paint as a reason to pause. Paint applied to Australian walls in the 1970s may contain lead. That doesn’t mean every painted surface from that period contains it. It does mean you shouldn’t assume a peeling patch is safe to scrape simply because it looks like ordinary household paint.
- Don’t use scraping or sanding as a test. These actions disturb the coating and can create paint flakes and dust. A small patch beside a window or hallway may still have older layers underneath. Stop before starting routine paint preparation if the property’s age raises a lead concern.
- Keep the damaged area undisturbed while you decide next steps. Don’t brush, scrape or sand suspect paint to make it look tidier for an open home. Keep people away from the immediate work area, especially while loose flakes remain. Avoid moving paint debris around the room before its status is understood.
- Use protective equipment if paint removal proceeds. A safety mask, gloves and goggles are appropriate protective equipment when removing peeling paint. Hearing protection is also advised when using power tools. Protective equipment doesn’t establish whether old paint contains lead, so it shouldn’t replace checking the risk first.
- Separate lead concerns from ordinary surface repairs. If a home predates 1979, don’t treat patching, sanding and repainting as a routine cosmetic job until possible lead-based paint has been considered. The same applies to a 1970s wall with newer paint over it. Keep the repair plan focused on avoiding unnecessary disturbance.
- Build the inspection schedule around safe preparation. An open house creates pressure to make peeling paint disappear quickly, but rushing into scraping can disturb suspect layers. Identify the wall’s age, pause work where lead is a concern, and plan repainting only after that issue is addressed. A neat finish starts with a safe, considered preparation step.
Squirtz Property Detailing: House Washing
Squirtz Property Detailing supports pre-sale preparation with House Washing and Internal & External Painting. House washing refreshes the exterior, while painting addresses peeling or worn paint as part of a broader property tidy-up.
Match the work to the issue. If paint is peeling indoors, exterior washing won’t fix it. Arrange painting only after the moisture source has been addressed and the surface properly prepared. For exterior paintwork, consider how washing and painting fit the condition of the surfaces. This helps focus effort on improvements buyers will notice before they arrive.
Contact Squirtz Property Detailing to discuss property preparation, or visit squirtzpropertydetailing.com.
Prepare the whole property for its next viewing
After fixing peeling paint before an open house, look beyond the repaired wall and consider buyers’ first impression, from the street to the garden. A tidy exterior and well-kept outdoor areas help the property feel cared for as visitors move through it. Choose improvements that suit the home and its presentation, rather than adding work that doesn’t address what buyers will see.
Squirtz Property Detailing offers House Washing, Garden Landscaping & Makeovers, and Swimming Pool Renovations as part of property preparation. These services can refresh outdoor areas when they’re part of your open-home plans. Choose the next step based on which parts of the property need attention and how they work together.
Discuss your property preparation plans with Squirtz Property Detailing. A considered plan can help you move from last-minute fixes to a home that feels ready to welcome prospective buyers.
Frequently Asked Questions
Do You Have to Strip the Whole Wall?
No, not automatically. Remove only paint that has lost adhesion. If scraping reveals sound coating around a small patch, a local repair may be enough. If paint keeps lifting, comes away in sheets or spans the wall, remove more of the affected paint rather than leaving unstable edges. Peeling across a ceiling or several walls may need a broader assessment before you choose a patch.
How much does DIY peeling-paint repair cost in Australia
DIY costs depend on the repair size, wall condition and supplies you already have. Allow for primer, matching paint, patching compound and preparation materials. A small, sound patch needs less than widespread flaking or damaged plaster.
How long does paint take to dry and cure before an open house
Drying time varies by product and conditions, so follow the tin’s instructions for recoating and handling. Surface drying is not the same as full curing. Avoid touching, cleaning or placing furniture against the repair too soon.


